A collaboration between Upbound and Red Hat Emerging Technologies explores the Crossplane project and its recent optimization with Red Hat OpenShift Container Platform as an alternative to Open Service Broker API for provisioning, managing, and consuming external services by cloud native applications. In this blog post, we will build a catalog of infrastructure and services, then deploy an application to a public cloud provider.
A challenge that many of our customers and developers face in adopting a hybrid cloud strategy is how to effectively utilize services from different providers while maintaining the ability to be portable. The goal of "write once, run everywhere" can be difficult to fulfill when taking advantage of managed services offered by cloud providers. Crossplane has created a solution to allow developers to abstract their resource requirements into a simple Kubernetes aware API that provides a translation layer for each provider avoiding API lock-in from different vendors.
The Software as a Service (SaaS) model as adopted by many independent software vendors and cloud providers offers a way for developers to provision external services for their workloads in cloud native platforms such as Kubernetes or OpenShift. API extensions like the Kubernetes Service Catalog based on the Open Service Broker API specification is one example used to help provision external services in a cluster. However, this approach has not been widely adopted and lacks support for some of the more modern features of orchestration platforms that users have come to rely on, such as active management, workload scheduling, and a separation of concerns between infrastructure and application owners.
Today, popular cloud platforms natively offer managed services such as Database-as-a-Service (DBaaS), Platform-as-a-Service (PaaS), and many others. As an example of this, we can look at AWS, which has a built-in DBaaS called Relational Database Service (RDS) supporting multiple database engines such as MySQL, PostgreSQL, and Oracle Database. Users of container orchestration platforms such as OpenShift Container Platform and Kubernetes have shown a desire to take advantage of such service offerings to help build and scale their workloads and applications.
In much the same way that each cloud provider has a central control plane to manage all aspects of its infrastructure and services, Kubernetes is also built around a central control plane to orchestrate the resources of the cluster. Crossplane offers an open source multi-cloud control plane that directly extends the existing control plane of Kubernetes to integrate the two. This essentially augments our on-premises containerized applications with all of the valuable and diverse infrastructure and services available from each of the cloud providers.
Because Crossplane extends the existing Kubernetes API, this cloud infrastructure and service functionality can now be managed in the same way as our containerized applications. This unified control plane approach effectively standardizes both applications and infrastructure on the same declarative configuration model and API pioneered by the Kubernetes community.
Crossplane recently integrated with the Operator Framework to take advantage of its more complete lifecycle management and to also natively integrate with OpenShift. The Operator Framework with the Operator SDK, Operator Lifecycle Manager (OLM), OperatorHub, Operator Registry, and Operator Metering offers a consistent way to not only package, deploy and manage the lifecycle of your software, but to also provide a way to capture and distribute field knowledge from the Operator that can be shared across all users of the Operator.
This full management cycle is one example of where Service Broker implementations fall short, as they are not capable of handling day-two operations in such a way to include updates, failover, and scaling. Operators are also the standard mechanism for deploying and managing software components on OpenShift clusters.
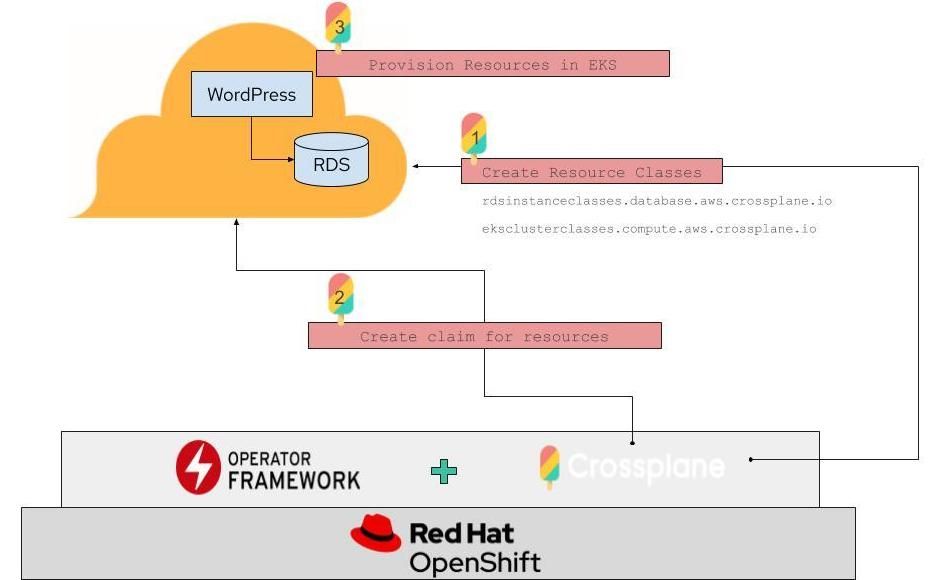
Let’s start to take a deeper look at using Crossplane to build a catalog of infrastructure and services to our applications running in an OpenShift 4.3 cluster. These services will be available to our applications in a self-service manner that allows the applications to provision services on-demand and in a way that is compliant with the policies and constraints defined by their operations team. Once this catalog has been created, we will use it to deploy a WordPress application as well as all of the cloud infrastructure and services that it needs to run in Amazon Web Services (AWS).
The following diagram illustrates what this will look like.
Walkthrough: Deploying WordPress and its Infrastructure from the Catalog
The first step is to install the Crossplane operator from OperatorHub, following the instructions provided on https://operatorhub.io/operator/crossplane.
curl -sL https://github.com/operator-framework/operator-lifecycle-manager/releases/download/0.14.1/install.sh | bash -s 0.14.1

kubectl create -f https://operatorhub.io/install/crossplane.yaml
These commands ensure that OLM is running in our cluster, and then use it to download and install the Crossplane operator and all of its CRDs. When the process has completed, we see the Crossplane operator listed in the following output:
kubectl get csv -n operators
NAME                DISPLAY      VERSION   REPLACES   PHASE
crossplane.v0.9.0   Crossplane   0.9.0                Succeeded
For this walkthrough, we are also going to use the Crossplane CLI tool, so let’s get that installed as well:
CROSSPLANE_CLI_RELEASE=v0.6.0
curl -sL https://raw.githubusercontent.com/crossplane/crossplane-cli/"${CROSSPLANE_CLI_RELEASE}"/bootstrap.sh | env RELEASE=${CROSSPLANE_CLI_RELEASE} bash

oc new-project crossplane-system
We now use the Crossplane CLI tool to add additional support for AWS that needs to provision cloud infrastructure and services there:
oc crossplane package install --cluster -n crossplane-system 'crossplane/provider-aws:v0.7.1' aws-provider

oc crossplane package install --cluster -n crossplane-system 'crossplane/stack-minimal-aws:v0.3.0' aws-sample
It takes a few seconds to download the AWS packages, but you’ll see similar output once they have completed (note the READY: true column):
kubectl -n crossplane-system get ClusterStackInstall
NAME           READY   SOURCE   PACKAGE                               CRD   AGE
aws-provider   True             crossplane/provider-aws:v0.7.1              35s
aws-sample     True             crossplane/stack-minimal-aws:v0.3.0         25s
We also need to make our AWS credentials available to the Crossplane operator, so that it provisions AWS infrastructure on our behalf later on. The following commands look a bit complicated, but they basically import our credentials that we are already using locally for the AWS CLI into a secret in our Kubernetes cluster:
AWS_PROFILE=default && BASE64ENCODED_AWS_ACCOUNT_CREDS=$(echo -e "[$AWS_PROFILE]\naws_access_key_id = $(aws configure get aws_access_key_id --profile $AWS_PROFILE)\naws_secret_access_key = $(aws configure get aws_secret_access_key --profile $AWS_PROFILE)" | base64  | tr -d "\n")

AWS_PROFILE=default && AWS_REGION=$(aws configure get region --profile ${AWS_PROFILE})

cat > aws-secret.yaml <<EOF
apiVersion: v1
kind: Secret
metadata:
  name: aws-account-creds
  namespace: crossplane-system
type: Opaque
data:
  credentials: ${BASE64ENCODED_AWS_ACCOUNT_CREDS}
EOF

# apply it to the cluster:
oc apply -f "aws-secret.yaml"
To remove any lingering local artifacts of our credentials, let’s do just a bit of clean up now:
unset BASE64ENCODED_AWS_ACCOUNT_CREDS
rm -f aws-secret.yaml
Populating the Catalog with Infrastructure and Service Classes
With the AWS support now ready and supplied with our AWS credentials, we can start building out our catalog of infrastructure and service classes. These classes are available to application developers to self-service provision their infrastructure when they need it, while enforcing the parameters and policy that we have specified within the classes.
We could create these classes by hand simply by authoring YAML configuration for instances of the available classes for AWS resources that we are interested in populating our catalog with. Some examples would be EKSClusterClass, RDSInstanceClass, and others. However, in this post we take advantage of some reusable classes that the Crossplane project has already published for us.
To do so, we create an instance of a MinimalAWS resource and the Crossplane controller responds by creating a set of AWS classes for us to reuse:
cat > aws-sample.yaml <<EOF
apiVersion: aws.resourcepacks.crossplane.io/v1alpha1
kind: MinimalAWS
metadata:
  name: my-aws
spec:
  region: ${AWS_REGION}
  credentialsSecretRef:
    name: aws-account-creds
    namespace: crossplane-system
    key: credentials
EOF

oc apply -f "aws-sample.yaml"
Our sample AWS classes and basic networking infrastructure should be ready for us soon, so let’s take a look at some of the classes that were created for our catalog:
oc get eksclusterclasses.compute.aws.crossplane.io
NAME                PROVIDER-REF          RECLAIM-POLICY   AGE
my-aws-ekscluster   my-aws-aws-provider   Delete           14m

oc get rdsinstanceclasses.database.aws.crossplane.io
NAME                PROVIDER-REF          RECLAIM-POLICY   AGE
my-aws-mysql        my-aws-aws-provider   Delete           14m
my-aws-postgresql   my-aws-aws-provider   Delete           14m
As shown above, we now have a few classes in our catalog that the application developers in our cluster can use to create EKS clusters and RDS databases (MySQL and PostgreSQL) when their applications need them.
Deploying the Application
Now we’ll begin deploying the WordPress application itself. First we need to add Crossplane support for WordPress into the cluster:
oc new-project wordpressapp-wordpress
oc crossplane package install -n wordpress 'crossplane/app-wordpress:v0.2.0'
This downloads the WordPress package and installs a WordPress CRD and controller to manage it. We can check on when the download is complete with the following:
oc -n wordpress get StackInstall
NAME            READY   SOURCE   PACKAGE                           CRD   AGE
app-wordpress   True             crossplane/app-wordpress:v0.2.0         78s
The WordPress support is ready, so we can create an instance of the WordPress CRD, causing its controller to instantiate everything needed to get our application running, including the infrastructure that it runs on.
cat > wordpress.yaml <<EOF
apiVersion: wordpress.apps.crossplane.io/v1alpha1
kind: WordpressInstance
metadata:
  name: my-wordpress
  namespace: wordpress
spec:
  provisionPolicy: ProvisionNewCluster
EOF

kubectl apply -f wordpress.yaml
With the WordPress CRD created, the controllers begin their magic to use our catalog of classes to provision and deploy everything. A lot is going to happen right now, so let’s summarize it:
- The WordPress controller sees the WordPress CRD and creates claims for the infrastructure that it will need: A MySQL database to persist the WordPress data and a Kubernetes cluster to run the WordPress container.
- The infrastructure claims are matched by Crossplane to classes in our catalog. In this case, the MySQL claim is matched to our Amazon RDS class, and the Kubernetes cluster claim is matched to our Amazon EKS class.
- The Crossplane controllers use the AWS API and the credentials you imported as a secret to provision instances of RDS and EKS. These are configured exactly as the classes from the catalog specified.
- When RDS and EKS have completed provisioning (which does take a while, so be patient), they are then bound to the claims that the WordPress app requested.
- The WordPress controller then deploys the WordPress container to the EKS cluster, which connects to the RDS database to store its data. A load balancer is connected to the WordPress pod, making the final connection for us to now go visit our new WordPress site.
We can check on all the infrastructure and services being created during this process with the following commands:
oc -n wordpress get wordpressinstance
oc -n wordpress get kubernetesclusters
oc -n wordpress get mysqlinstances
oc -n wordpress get kubernetesapplications
oc -n wordpress get kubernetesapplicationresources
Once everything is created and ready, we’ll finally see the load balancers URL where our new WordPress site will be waiting for us:
oc -n wordpress get kubernetesapplicationresources my-wordpress-service -o jsonpath={.status.remote.loadBalancer.ingress[0].hostname}
a4151a2d06b3b4aeb8e50894fd2d7cda-2126776379.us-west-2.elb.amazonaws.com
Visiting that URL in a web browser should display the WordPress start page.
Summary
That was a whole lot of application and infrastructure operations being automated for us, so let’s summarize the key parts and why they are important.
- The Crossplane operator was installed into our OpenShift cluster, bringing cloud service provisioning to OpenShift clusters, so cloud native apps can consume the infrastructure they need directly from Kubernetes
- As an infrastructure owner, we built a catalog of infrastructure and service classes that define the set of services we want to enable our application teams to create when they need it. This catalog of classes also enforces specific policy and configuration that we care about as an infrastructure owner.
- As an application developer, we consumed these classes from the catalog to provision the infrastructure our application needs in a self-service way. We didn’t have to file a ticket with the ops team and wait for them, we were able to provision it ourselves, and still remain compliant with the policy and config the ops team requires.
Red Hat and Crossplane are excited to continue working together to bring more value to your OpenShift clusters. We welcome you to try this scenario out for yourself using the links below and we would love for you to get involved. Whether you are a developer, user, or just interested in what we're up to, feel free to join us!
Special thanks to Scott Creeley and Erin Boyd of Red Hat for their contributions to this post