This is the second part of our Deep Dive into Terrajet series. In the first one, we have discussed how we are generating Custom Resource Definitions (CRDs) for resources of an existing Terraform provider. The next step of extending the Kubernetes API with custom resources is building a controller that reconciles CRDs, which we will focus on in this part. We will talk about how we have built a generic controller for all Terrajet based resources on top of Crossplane’s managed reconciler which codifies all the best practices built by the community so far. We will also discuss how we have handled differences due to running Terraform as part of an active reconciliation instead of running it as a CLI tool.
One Controller for All
Kubernetes docs define controllers as follows:
In Kubernetes, controllers are control loops that watch the state of your cluster, then make or request changes where needed. Each controller tries to move the current cluster state closer to the desired state.
Applying this to our controller, it will need to watch the current state of our external resource and try to bring it to the desired state. Here comes the tricky part, how should a controller that keeps running can bring the external resource into the desired state with Terraform CLI? Should we simply call terraform apply periodically and let it do the rest? Yeah, that could be a good POC :) However, for something real, we wouldn’t want a controller that keeps calling long-running terraform apply’s on our infrastructure resource no matter it is already up to date or not. Following the Kubernetes controller pattern, we want our controller to watch the state of our resource before taking any action. In other words, observe the current state and try to move it to the desired state only if they do not match.
Terraform provides a unified interface to interact with all resources; all define a set of arguments (inputs) and attributes (outputs), some arguments are optional, some are required, some are marked as sensitive, etc. Once we configure our resource(s) in a .tf file, we need to run terraform plan to see the configuration drift and run terraform apply to create/update our resource with desired specifications no matter which resource we’re interacting with. This is a great opportunity to build a common controller for all resources and one of the reasons behind our design choice of interacting with CLI instead of importing provider code or talking to provider servers via gRPC.
Before diving into more details on how this common controller works, let’s do a quick recap on Crossplane’s managed reconciler.
Crossplane Managed Reconciler
Crossplane aims to manage cloud resources (indeed any resource external to Kubernetes) behind a single, well-defined and consistent API. In other words, similar to how Kubernetes makes distributed workload management easier with an opinionated resource schema (e.g. apiVersion, Kind, spec, status, etc.), Crossplane aims to bring infrastructure management under control and unlock further innovations leveraging a similar consistency.
The Crossplane team did an excellent job on defining this API and building all the best practices to interact with this API as a reusable piece of code so that no one needs to reinvent the wheel. Here comes the managed reconciler; the reconciler powering every managed resource controller in Crossplane.
To use this reconciler and leverage all the previous knowledge built by the community so far, we need the following two:
- Our CRD should satisfy the
Managedinterface. - We need to implement an
ExternalConnectorthat builds a client interacting with our external (cloud) API satisfying theExternalClientinterface.
The Managed interface ensures our Custom Resource has a consistent API with other resources in the Crossplane ecosystem, in other words, to be compliant with the Crossplane Resource Model (XRM). In the first part, we have already discussed how we have generated our CRDs accordingly using the resource schema in Terraform provider, you can find more details there.
Terraform as an External Client
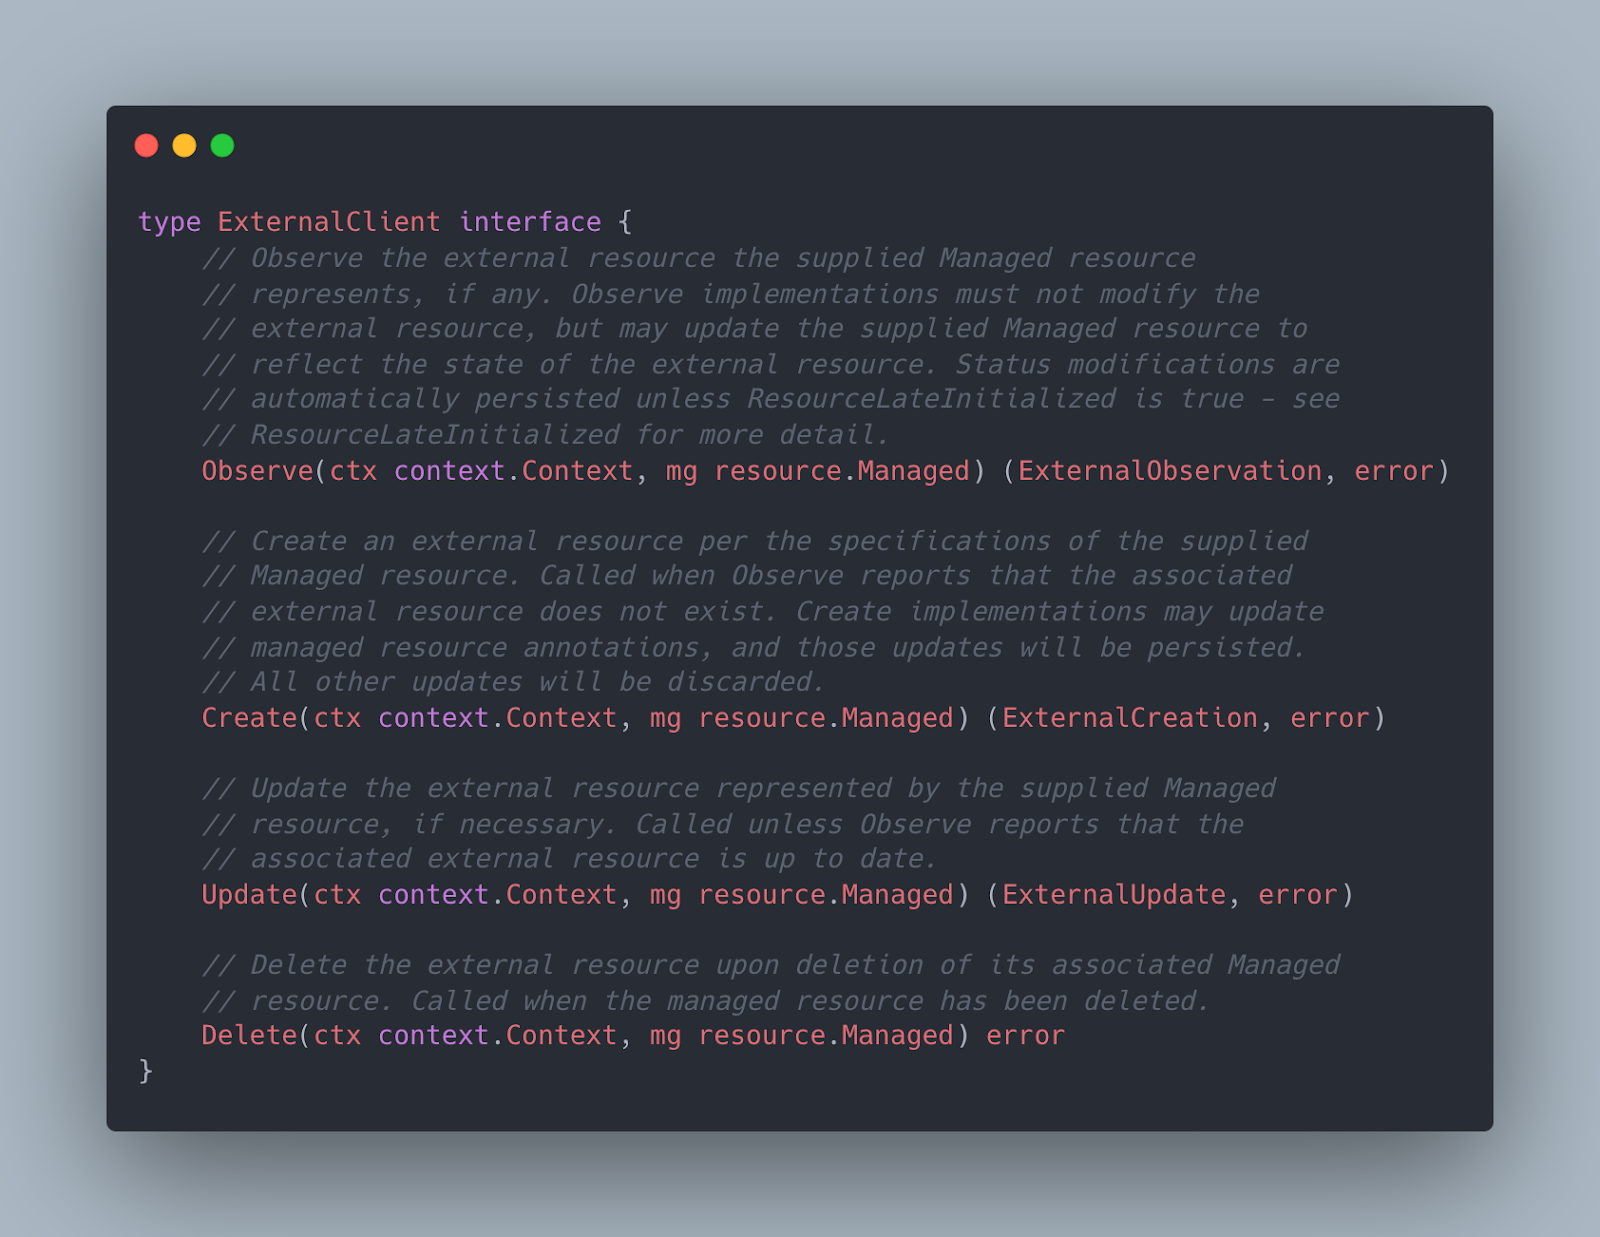
For Terrajet based providers, Terraform CLI is the client that we use to interact with external APIs. This means we will need to implement an ExternalClient that uses Terraform CLI under the hood. Once we build the 4 methods, namely Observe, Create, Update and Delete, we will have a generic controller for all Terrajet based resources which also leverages all the best practices that the Crossplane community has built so far.
However, there is one important point here. Although we use the Terraform CLI to interact with any external API, there are differences in the configuration required to connect to different cloud providers like credentials and keys. Terrajet expects each provider to implement a specific setup function that returns a Setup object which will then be used in the Connect method that builds our ExternalClient. This Setup object is built by translating the configuration from Crossplane’s ProviderConfig CR to Terraform’s Provider Configuration.
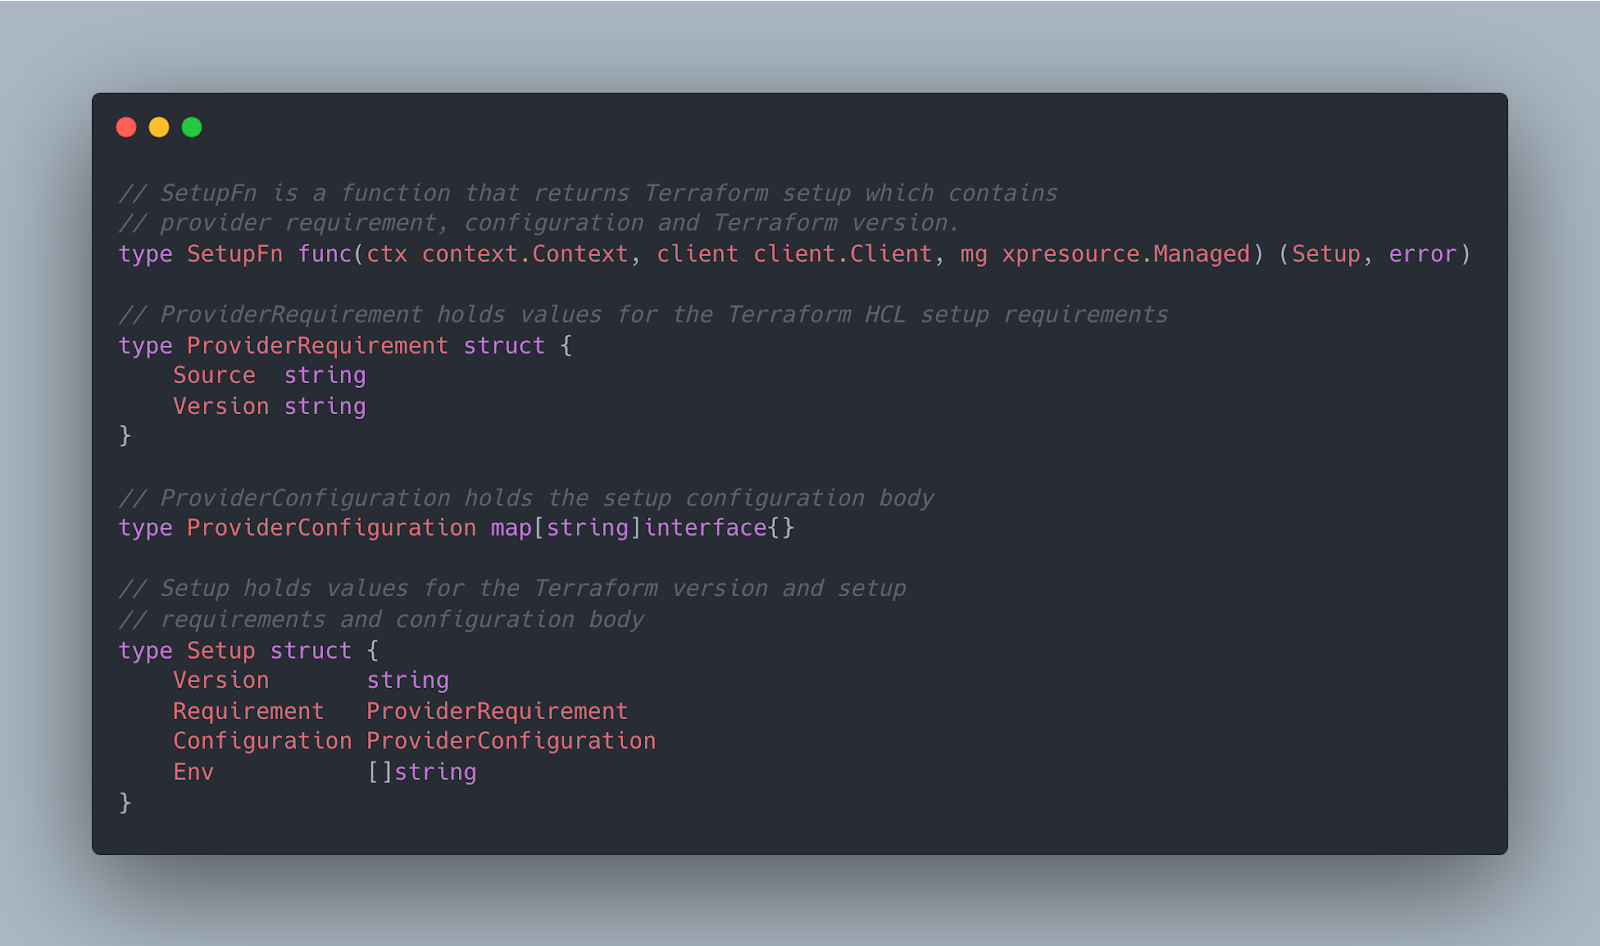
Connect method is one of the first methods called in the managed reconciler to build and return an external client for a given managed resource. In Terrajet, we have a generic Connector type that builds the external client using the aforementioned Setup object in its Connect method.

At this step, a temporary directory on the pod file system is prepared as a dedicated Terraform workspace for the CR instance being reconciled. We will not go into further details now on how we are building and managing those workspaces since we will dive into that in the next part of this series. All we need to know for now is, after this step, we have everything set up and configured for our Terraform CLI to talk to the external API.
CRUD My External Resource: Implementing the 4 Methods
Having configured the Terraform CLI against an external API, let’s use it in our controller.
Let’s start with the easy ones. Create and Update implementations are almost the same, calling terraform apply behind the scenes with the desired state. The only difference is, with Create we also want to capture and store any sensitive data that could be returned by the external API only once during creation. AWS secret access keys are a good example of such a resource. Delete, on the other hand, simply calls terraform destroy as you might have guessed.
Both terraform apply and destroy calls are blocking which could be problematic for long-running calls. Imagine you want to create a database that takes half an hour and you get no feedback (in CR status or as a K8s event) until it either succeeds or fails because that call blocks the whole reconciliation. To deal with that, we have implemented async flavors of those calls which could be configured for such resources, i.e. resources with long timeouts (e.g. > 5 mins) according to the Terraform documentation.
Before moving to the more challenging Observe method, there is one caveat with Update that is worth mentioning. There are some changes in Terraform that could be destructive, meaning an update call could cause existing infrastructure to be destroyed and a new one with the desired spec to be created. This is usually fine with a CLI tool, which also provides ways to warn the user or ask for confirmation before proceeding. With a control plane approach that Crossplane offers, this does not make sense and an external resource corresponding to a CR should never be deleted unless there is an explicit delete call. Hence, Terrajet always runs terraform apply calls with prevent_destroy lifecycle hook. This means, introducing a destructive change to a managed resource will simply fail with some error indicating that change is not possible without destroying the external resource.
Observing the External Resource
Ok, now let’s move to Observe method, which should return answers to the following questions:
- Does the resource exist?
- Is the resource up to date?
- What are the connection details?
- Is the resource late initialized?
To answer these, we will need to watch the current state of the resource and compare it with the desired state. But wait, where is the desired state?
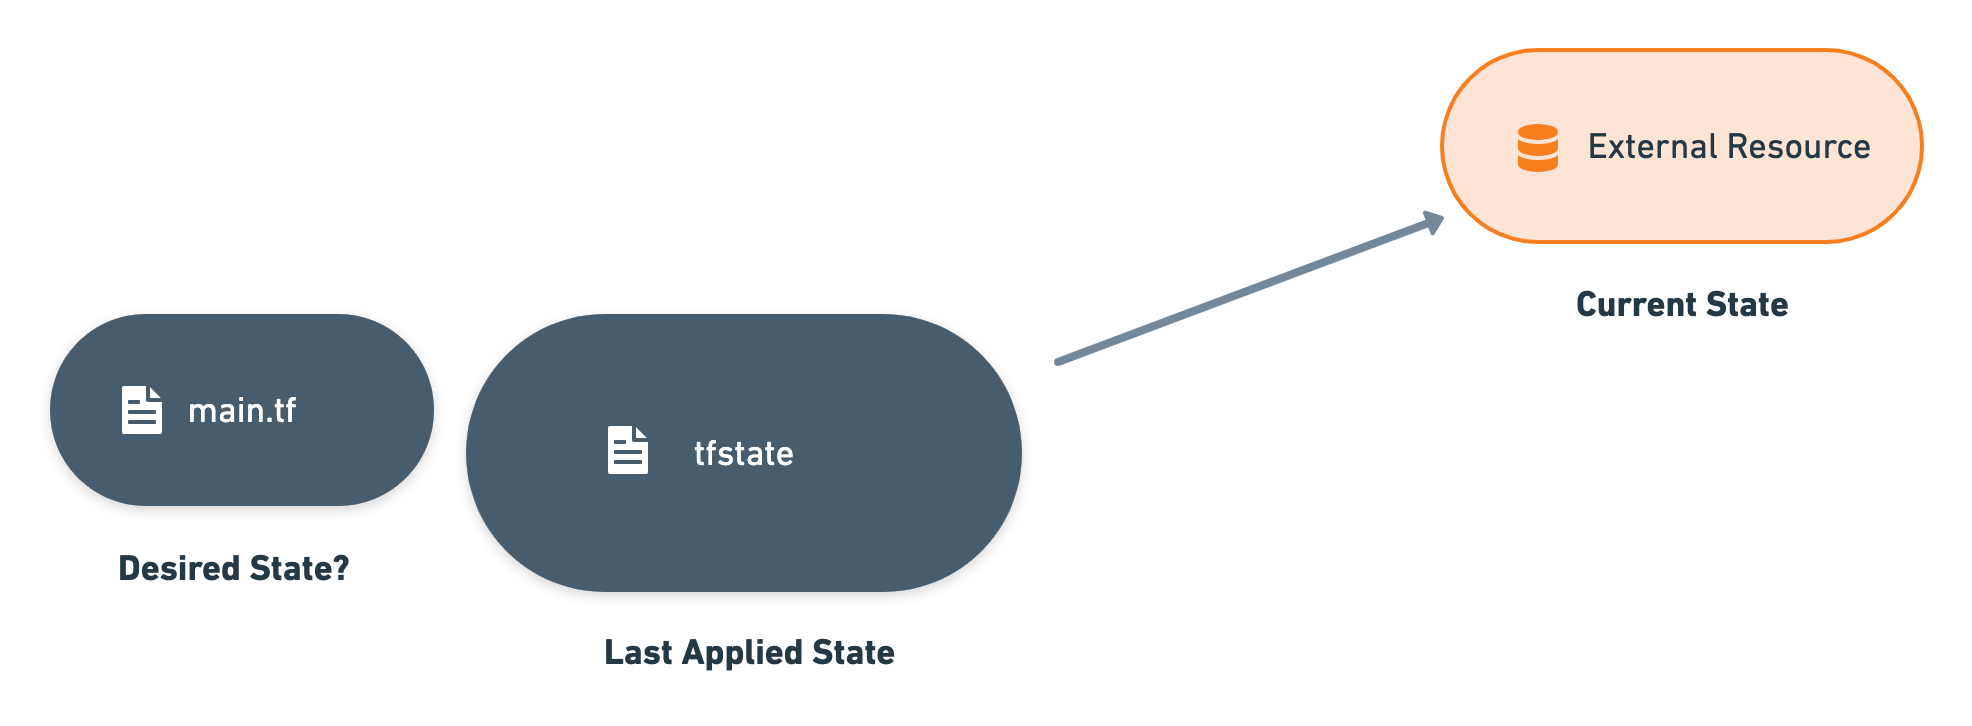
Terraform keeps the last applied state in a local .tfstate file and does a refresh to update it with the current state prior to any operation. According to terraform documentation, this state file is used to:
- Map real-world resources to your configuration
- Keep track of metadata
- Improve performance for large infrastructures
In Crossplane, there is always a one-to-one mapping between a CR and an external resource. This means that there will always be one resource in our .tfstate hence we can ignore the last use case. For mapping real word resources, Crossplane has the External Name concept. For tracking metadata, we can use annotations or labels of our CRs. So, we can indeed get rid of the management of a .tfstate file by translating pieces into Crossplane/Kubernetes realm.
Once we can uniquely identify an external resource using its External Name, we can just observe its current state by “refreshing”. The desired state is already available in our CR, hence we can compare and figure out whether the resource is up to date or not by invoking a plan command. More details on the implementation of this coming in the next blog post. All we need to know for now is, there is no .tfstate file persisted somewhere, rather, we are just (re)building it using the information in our CR whenever it is needed.
OK, but, What About Sensitive Information?
There is also some sensitive information that needs to be handled properly, we can not just write them to spec or status of the managed resource. Terraform state files could contain sensitive data like private keys or there could be some input configuration like an initial password of a database.
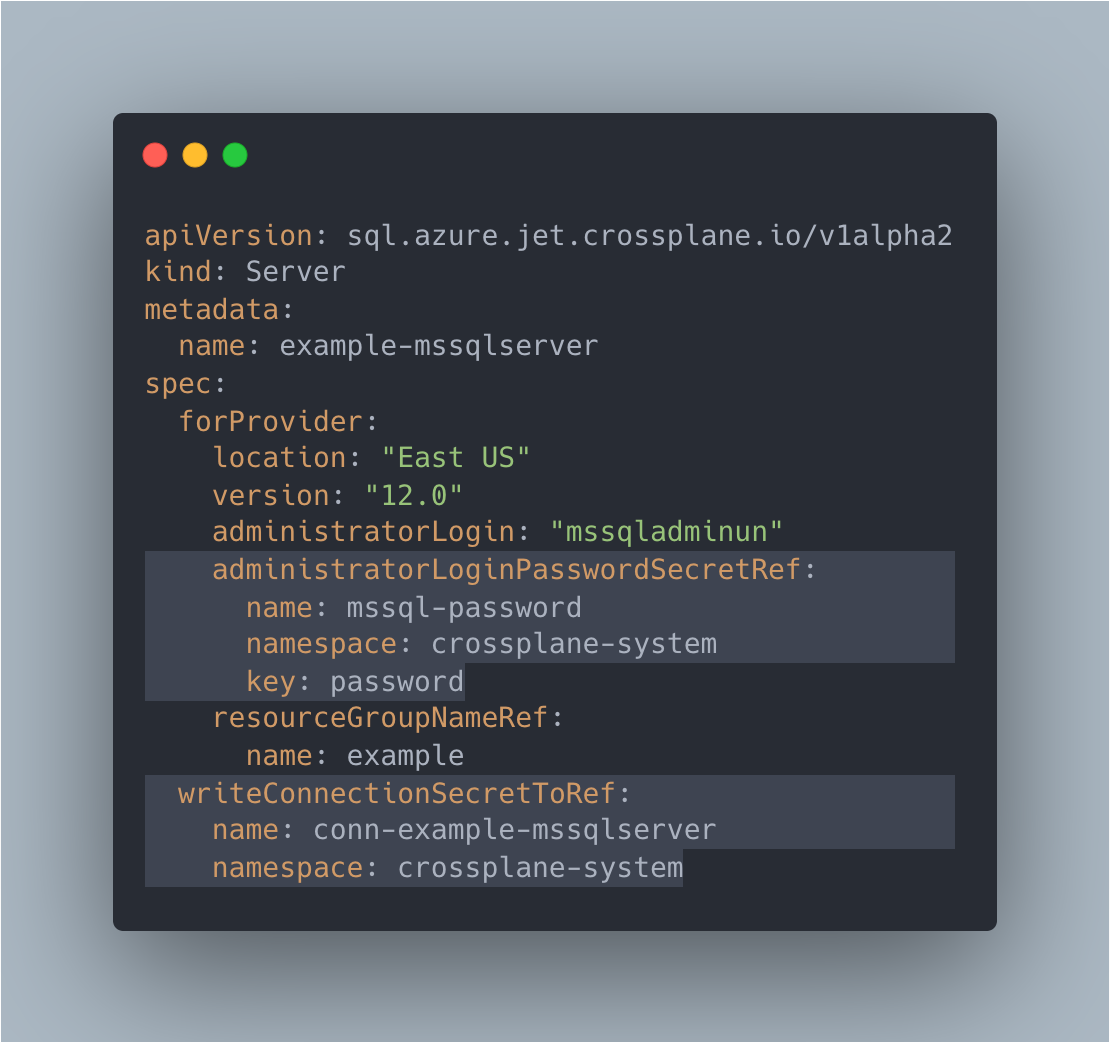
As you might have guessed, Kubernetes has secrets exactly for this purpose and Crossplane has the concept of Connection Details, which are special K8s secrets holding the sensitive information required to connect to external resources. Sensitive fields are already marked in Terraform resource schema, so we already know which fields are sensitive. We just need to connect the dots and solve this problem:
- All sensitive input fields converted to Secret references
- All sensitive output fields (the ones coming from
tfstatefiles) are only written into the Connection Details secret.
This would also require us to collect the sensitive information distributed to secrets while building our desired state, so, we have implemented a two-way conversion from CR + Secrets to Terraform configuration and vice versa.
All output configuration that is marked as sensitive by Terraform will land in the connection secret. However, there are some cases where it would be convenient to have more information in a connection details secret like host and port which were not marked as sensitive (and could arguably be considered as sensitive as well) in schema or, we may want to store them in a well-known format like a kubeconfig. Thanks to Terrajet’s flexible and powerful configuration mechanism, all of these are possible by providing an AdditionalConnectionDetailsFn. Please check this and this as examples.
Single Source of Truth
Crossplane managed resources are authoritative on the external resources that they are managing. In other words, etcd is the single source of truth for the Crossplane managed resources. Hence, they need to have all the configurations for the resources including the optional ones that are initialized with some server-side defaults. Crossplane follows Kubernetes conventions to handle this type of configuration as well and late initializes them after resources are created with initially provided configuration. Similarly, terrajet runtime automatically performs late initialization using runtime.reflection for jet-based resources.
After the state is refreshed with the current state of the external resource, Terraformed resource’s LateInitialize method is called with the fresh state attributes. LateInitialize in turn employs Terrajet’s resource.GenericLateInitializer to perform late-initialization using the observed attributes from the provider. This library recursively sets previously unset attributes using the state data.
In most cases, Terrajet’s late initialization simply works with no custom configuration. However, there are some cases where customization is required in the late initialization behavior.
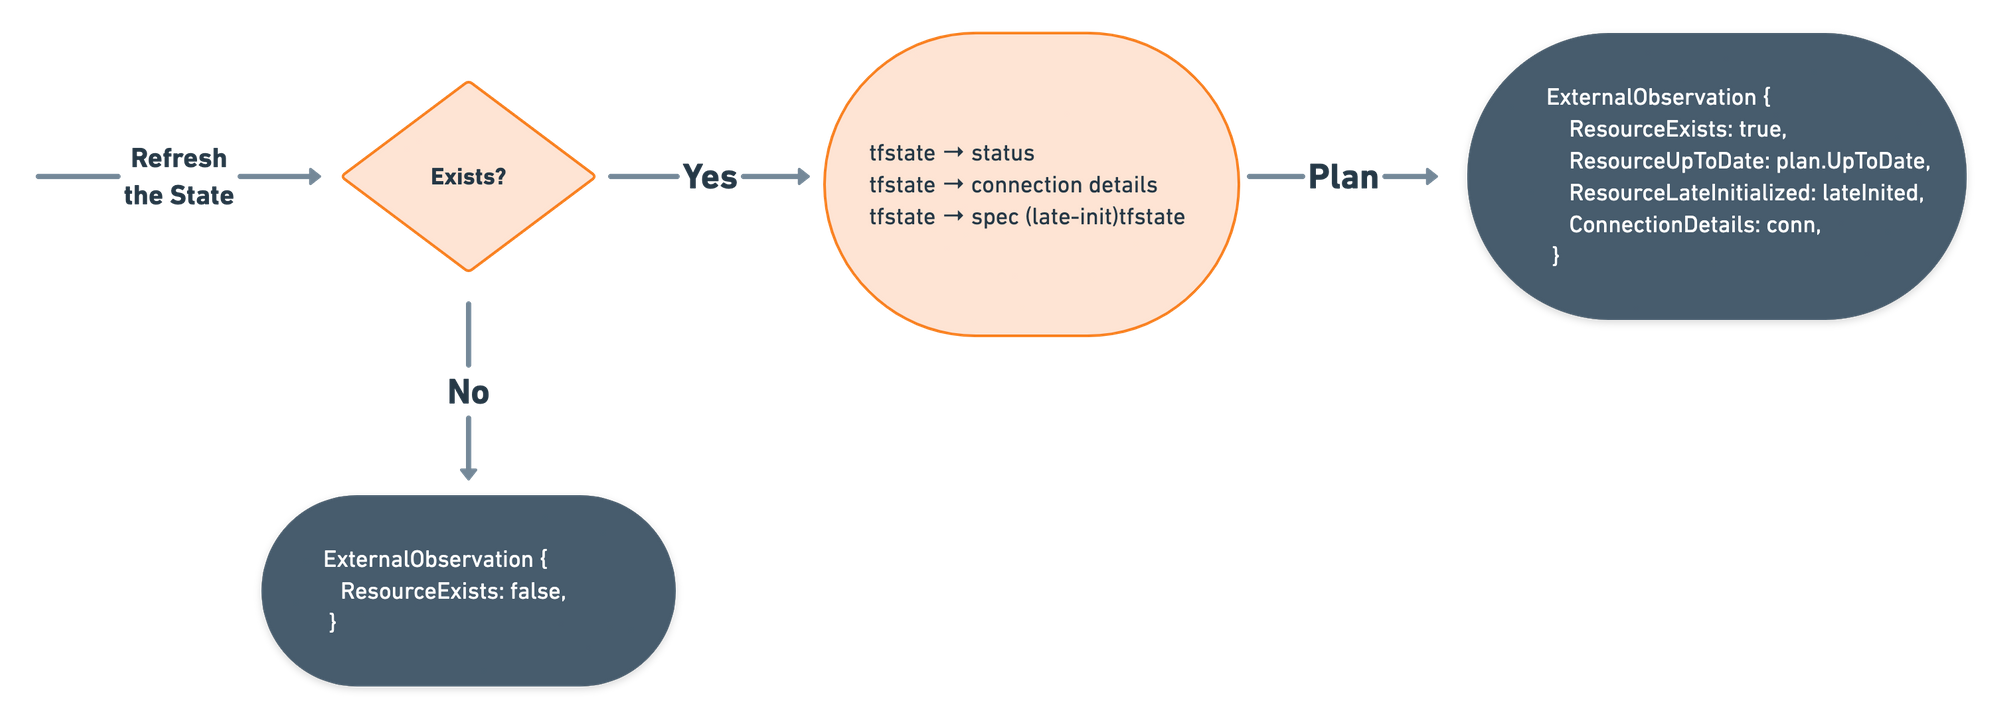
Finally, the Observe Method
Alright, having discussed all the important points, we can now talk about how we have brought them together and implemented the Observe method. It is expected to return an ExternalObservation without making any modifications on the external resource. Below you can see a simplified version of the Observe flow, which completes all the required methods to run as a Crossplane Managed Reconciler. In the actual implementation, we have further optimizations like handling async calls, marking resources as ready as soon as possible and, avoiding unnecessary plans, which are not shown in the flow for brevity.
What is next?
In this second part of our 3-part Terrajet deep dive series, we focused on the generic controller part and discussed how we applied the controller pattern using the Terraform CLI while leveraging Crossplane’s managed reconciler. We also briefly talked about how we are dealing with the Terraform state and how we are translating it to the Crossplane world. In the next and final part, we will dive into more details about working with Terraform CLI, setting up temporary workspaces, and building state files using the information in etcd.
If you have more questions about Terrajet, or want to talk more generally about Crossplane, head to our Slack channel for feedback from community experts.